
Desserts
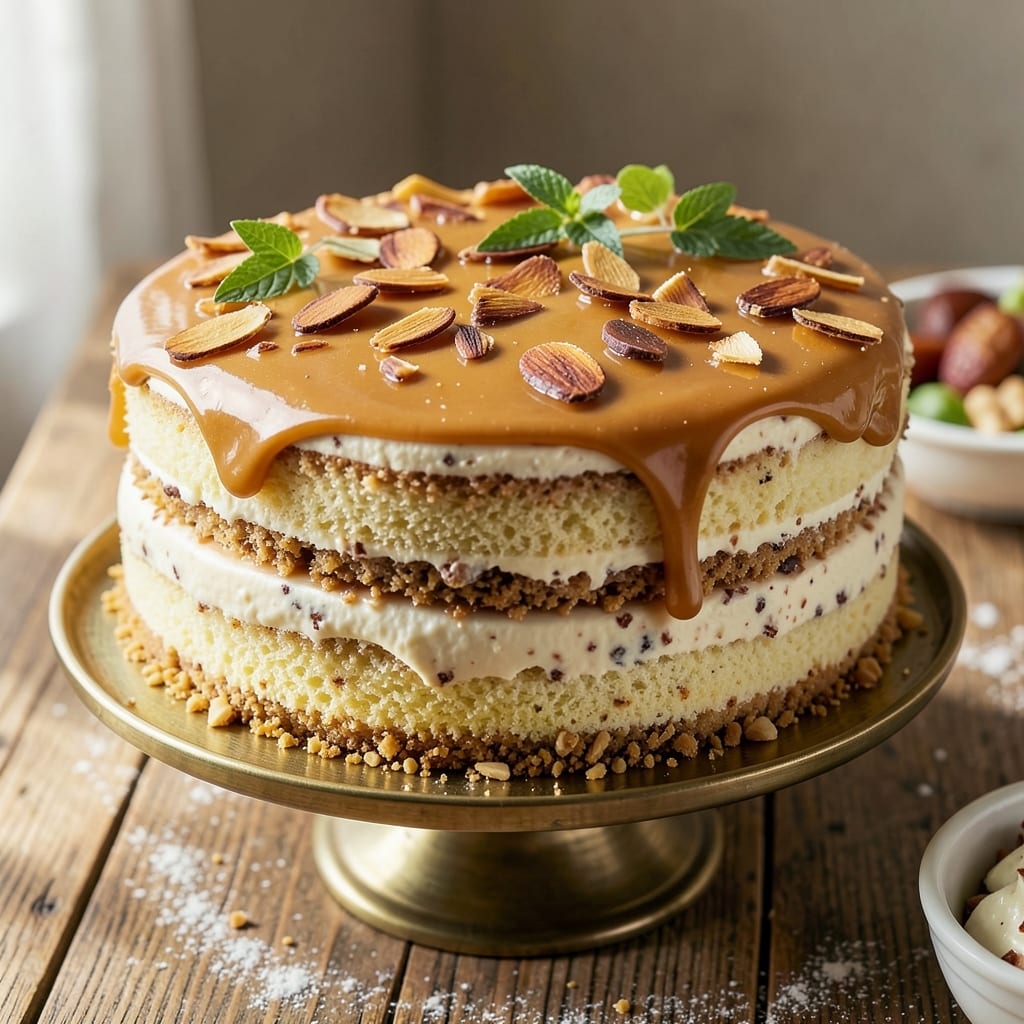
This almond crunch cake delivers the perfect balance of silky vanilla layers and a toasted nut crunch top that makes every bite irresistible. The secret lies in a simple technique—tossing whole almonds in brown butter before baking them directly onto the cake for that signature crunch. I developed this recipe after years of testing, and it never fails to impress with its tender crumb and addictive texture.
The cake itself is a foolproof vanilla sponge that bakes up light and moist, while the almond topping adds a satisfying contrast. No special equipment is needed—just a standard cake pan and a little patience for the almonds to toast to golden perfection. The result? A dessert that feels like a bakery masterpiece but comes together in your own kitchen.
What makes this recipe truly stand out is how the warm, nutty flavor of the toasted almonds complements the buttery vanilla layers. Each slice offers a perfectly balanced combination of softness and crunch, making it ideal for celebrations or a special treat. The cake keeps well for days, so you can enjoy it without rushing.
Serve it warm with a scoop of vanilla ice cream or dusted with powdered sugar for an elegant finish. This recipe is designed to deliver restaurant-quality results with minimal effort, ensuring your guests will think you spent hours in the kitchen. Let's get baking!
Ingredients for almond crunch cake
Simple pantry staples and a handful of almonds create this showstopping dessert.
| Ingredient | Amount | Notes |
|---|---|---|
| All-Purpose Flour 🌾 | 2 ½ cups | Sifted for light texture |
| Granulated Sugar 🍚 | 2 cups | White or light brown |
| Unsalted Butter 🧈 | 1 ½ cups | Room temperature, cubed |
| Large Eggs 🥚 | 4 whole | Room temperature |
| Vanilla Extract 🌸 | 2 tsp | Pure, high-quality |
| Baking Powder 🧂 | 2 tsp | Aluminum-free preferred |
| Salt 🧂 | ½ tsp | Fine sea salt |
| Whole Almonds 🥜 | 2 cups | Unsalted, skin-on preferred |
| Brown Butter 🧈 | ½ cup | For toasting almonds |
| Powdered Sugar 🍚 | ½ cup | For dusting (optional) |
| Vanilla Ice Cream 🍦 | 2 cups | For serving (optional) |
The almonds are the star—skin-on, unsalted ones from Trader Joe's or bulk bins at natural food stores have the best flavor. Toasting them in brown butter gives that signature crunch, so don't skip that step. For the butter, I always use European-style (like Plugrá)—it's higher in fat and gives a richer flavor. The vanilla extract should be pure, not imitation. If you're in a pinch, almond extract can add depth, but use half the amount. The flour? Sift it—this isn't the time to skip that step for a lighter texture.
No vanilla extract? Vanilla bean paste works great, or even vanilla sugar (just dissolve 1 tsp in the butter). Running out of almonds? Pecans or hazelnuts toast just as well, though the flavor will differ slightly. The brown butter can be made fresh (just melt butter until it turns golden and nutty) or use pre-made from the store. For the powdered sugar topping, confectioners' sugar is ideal, but if you only have granulated, pulse it in a food processor for a second. The ice cream? Homemade is best, but store-bought works too—just pick a good-quality vanilla flavor.
Store the cake in an airtight container at room temperature for up to 3 days—it actually tastes better the next day as the flavors meld. For longer storage, wrap it tightly in plastic and refrigerate for up to 5 days. The almond topping stays crisp for days, but if it softens, just toast it again in the oven for a minute or two. Freeze for up to 3 months if you want to make it ahead. I always bake an extra pan—this cake disappears fast, especially when paired with that scoop of ice cream.
Why You'll Love This Recipe
- No Mixer Needed: I swear by this—just a bowl and a whisk. The butter and sugar get creamed by hand (yes, it’s satisfying), and the eggs fold in like butter. No stand mixer? No problem.
- Vanilla-Butter Bliss: That classic combo of vanilla and rich butter? It’s the star here. The cake stays moist but never cloying, and the crunch from toasted almonds (if you add them) cuts through the sweetness like a perfect contrast.
- Birthday or Breakfast: Serve it warm with ice cream for a crowd-pleasing dessert, or slice it cold for a weekend brunch. Honestly, I’ve had it both ways—and so will you, because it’s that adaptable.
- Budget-Friendly Staples: Flour, sugar, butter, eggs—these are pantry basics that won’t break the bank. A single batch feeds six, and leftovers? They disappear faster than you can say “second slice.”
Step-by-step instructions for almond crunch cake
Here's how to create layers of silky vanilla cake with a nutty crunch topping that'll impress anyone.
Toast the Almonds for Maximum Crunch
Preheat your oven to 350°F. Spread the 2 cups of whole almonds in a single layer on a rimmed baking sheet. Drizzle the 0.5 cup of brown butter evenly over the almonds and toss gently with a spatula until they're well coated. The brown butter adds a nutty depth that pairs perfectly with the vanilla cake.
Bake for 8-10 minutes, stirring halfway through, until the almonds are golden brown and fragrant. Watch them closely—they burn quickly. Let them cool completely before using, as warm almonds will make the topping soggy. Once cooled, you'll have perfectly toasted almonds ready to create that signature crunch.
Prepare the Cake Batter for Perfect Layers
In a large mixing bowl, combine the 2.5 cups of all-purpose flour, 2 cups of granulated sugar, 2 tsp of baking powder, and 0.5 tsp of salt. Whisk these dry ingredients together until evenly distributed—this prevents lumps in your cake. Sift the flour mixture if you prefer an extra-light texture, as mentioned in the ingredients.
In a separate bowl, beat the 1.5 cups of unsalted butter (at room temperature) and the 4 whole large eggs together until smooth and slightly pale. This creaming process incorporates air, which gives your cake that light, airy texture. Gradually add the dry ingredients to the butter mixture, alternating with 2 tsp of vanilla extract, mixing just until combined. Overmixing develops gluten and makes the cake dense, so stop as soon as everything is incorporated.
Bake the Cake Layers to Golden Perfection
Divide the batter evenly between two greased and floured 8-inch round cake pans. Tap the pans gently on the counter to remove any air bubbles. Bake at 350°F for 25-30 minutes, or until a toothpick inserted into the center comes out clean. The cake should spring back gently when pressed in the middle—this indicates it's fully baked.
Let the cakes cool in their pans for 10 minutes before transferring them to a wire rack to cool completely. This gradual cooling prevents cracking. While the cakes cool, you'll prepare the almond topping, ensuring everything comes together at the right time for assembly.
Assemble the Cake with Almond Crunch Topping
Once the cakes are completely cool, place one layer on a serving plate. Spread a thin layer of vanilla ice cream (about 1 cup) over the top of the cake. This ice cream layer adds moisture and creaminess between the cake layers, creating a delightful contrast with the crunchy topping.
Sprinkle half of the toasted almonds evenly over the ice cream. Place the second cake layer on top and spread the remaining 1 cup of ice cream over it. Finally, sprinkle the remaining toasted almonds over the top layer, pressing down gently to create that signature crunch. Dust with the 0.5 cup of powdered sugar if desired, using a fine-mesh sieve for an even finish.
Chill and Serve for Best Texture
Refrigerate the assembled cake for at least 2 hours before serving. This chilling time allows the flavors to meld and the ice cream to set slightly, creating a more stable and enjoyable texture. When ready to serve, slice with a warm knife for clean cuts and present with a dollop of extra ice cream on the side.
The result is a cake with layers of moist vanilla cake, creamy ice cream, and a generous crunch from the toasted almonds. Each bite delivers a perfect balance of textures and flavors—creamy, crunchy, and rich all in one delicious experience.
Pro Tips For Making Almond Crunch Cake
- Whisk Eggs Until Ribbon Stage: Don’t just beat the eggs—whisk them until they form a thick ribbon when the whisk is lifted. This ensures your almond crunch cake will be light and airy, not dense. I used to stop too early, and the texture always suffered. ---
- Toast the Almonds First: Lightly toast your almonds (sliced or whole) in a dry pan over medium heat for 3-4 minutes until fragrant. This deepens their flavor and prevents them from turning bitter in the cake. Skip this, and you’ll taste raw almond in every bite. ---
- Cream Butter and Sugar Slowly: Beat the butter and sugar together on low speed first, then gradually increase to medium-high. Rushing this step traps air unevenly, leading to a cake that’s heavy in spots. Let the butter soften slightly first—cold butter fights you. ---
- Fold Dry Ingredients Gently: When adding flour to the wet mixture, use a spatula to fold just until combined—don’t overmix. Overworking the batter develops gluten, which makes the cake tough instead of tender. Stop when there are a few dry streaks left.
Common mistakes when making this recipe
Overmixing the Batter
I’ve seen so many cakes turn out dense and tough because of this one mistake. When combining your wet and dry ingredients, stop mixing as soon as everything is just incorporated—no streaks of flour should remain. Overmixing develops gluten, which makes the cake tough instead of tender. I recommend mixing by hand with a spatula for better control over the texture. 💡
Skipping the Almond Cooling Step
Warm almonds will make your topping soggy, ruining that perfect crunch. Always let your toasted almonds cool completely before sprinkling them on the cake. I’ve seen people rush this step and end up with a sad, mushy topping. Patience here is key—just 5-10 minutes of cooling makes all the difference. ⏰
Uneven Almond Distribution
If your almonds aren’t spread evenly, you’ll end up with some bites that are too crunchy and others that are too soft. Sprinkle them in two layers—half on the first cake layer and half on the top—to ensure every slice has that satisfying crunch. Use a fine-mesh sieve for an even distribution, or gently press them down with the back of a spoon. 🥜
Not Using Brown Butter
Regular butter won’t give you that deep, nutty flavor the almonds need. Brown butter adds richness and complexity that pairs perfectly with the vanilla cake. If you’re short on time, use pre-made brown butter from the store, but don’t skip this step—it’s what makes this cake truly special. 🧈
Underbaking the Cake Layers
A toothpick should come out clean when you test your cake, but don’t overbake either. If the layers are underbaked, they’ll be gummy and dense. Bake until the edges pull away from the pan and the center springs back when pressed. I like to pull mine out when the toothpick has just a few moist crumbs—this ensures a tender crumb. 🔥
Rushing the Chill Time
Skipping the 2-hour chill in the fridge means the ice cream layer won’t set properly, and the cake might crumble when you slice it. This step is non-negotiable—it lets the flavors meld and gives the cake structure. If you’re in a hurry, at least let it sit for 1 hour, but trust me, the wait is worth it. ❄️
Nutrition facts
Frequently asked questions
Can I make this cake without ice cream between the layers?
If you prefer a simpler version, replace the ice cream with 1/2 cup of whipped cream or 1/4 cup of almond butter for extra nutty flavor. For a completely dairy-free option, use 1/2 cup of coconut whipped cream or 1/4 cup of apricot jam as a filling. Just adjust the assembly by spreading your chosen filling evenly between layers before adding the almond topping.
How do I store leftovers to keep the almond topping crisp?
Store your cake in an airtight container at room temperature for up to 3 days, but refrigerate for longer storage (5 days max). To refresh the crunch, sprinkle the top with a few extra toasted almonds and warm in a 300°F oven for 5-7 minutes before serving. For freezing, wrap individual slices tightly in plastic wrap and freeze for up to 3 months—thaw overnight in the fridge.
What's the best way to make this cake gluten-free?
Replace the all-purpose flour with a 1:1 gluten-free baking flour blend (like Bob's Red Mill) and add 1/2 tsp xanthan gum to improve texture. Use 1/4 cup almond milk instead of regular milk if your blend requires it. The cake will still be tender but slightly denser. For the crunch topping, gluten-free substitution won't affect the almonds—just focus on toasting them perfectly in brown butter.
Can I use sliced almonds instead of whole almonds for the topping?
Yes, but whole almonds create a better crunch texture. If using sliced almonds, reduce the amount to 1.5 cups since they're smaller. For maximum crunch, toast them in brown butter as directed, but watch closely—they'll burn faster than whole almonds. The flavor will be similar, but the texture contrast won't be as dramatic with sliced nuts.
How can I make this cake ahead of time for a party?
Bake the cake layers 2 days ahead and store them wrapped tightly at room temperature. Assemble the cake 1 day before serving, then refrigerate. Bring to room temperature for 1 hour before serving to let the flavors meld. For the best presentation, dust with powdered sugar just before serving to keep it looking fresh. The almond topping will stay crisp for days when stored properly.